Recently I had the opportunity to use a program called Z-Em@il, an add-on software product for Zaurus. Z-Em@il allows Zaurus ZR-5XXX and ZR-3XXX owners to conveniently send and receive Internet email. The email can originate from anywhere and go anywhere, including UNIX-land, PC-land or Zaurus-land.
It can even be used as a way of passing data files from various computer environments to the Zaurus. In the past, I have steered a number of my Zaurus contacts to Z-Em@il, with a suggestion that they check it out. Now you can read all about it from a guy who depends heavily on Zaurus to be organized at home, work and play.
Summary
The Z-Em@il software installed into my ZR-5700 without any problems using my PC. The installation and setup procedure are well documented in the User Guide. It took me a few hours to work my way through the setup, mostly because I was being careful to follow each instruction exactly. Setting up Internet addresses, usernames etc. is not something that I do very often. Slow and sure, is how I go.
The software occupies 352 KB of memory in the Zaurus. Since I was already familiar with Internet email on my PC, the process of creating, sending and receiving messages was as I expected. The software is easy to use, stable, and very well integrated with the existing Zaurus applications. You can even send Zaurus sketches and image files to your Zaurus friends! I was able to use my existing main CONTACTS database as the address book for emailing.
The software is geared to creating and reading messages offline. Dialup, transmit, and receive sessions happen swiftly and simply, with options that I am used to having with my PC based email software. Even for a first time Internet email Zaurus user, it would be a manageable task to install and become familiar with using it. Based on my testing, I certainly recommend Z-Em@il for Zaurus owners who want to email using their PDA.
Background
I have been a user of Internet email for several years. I have depended mostly on the Eudora email package loaded on my desktop PC at work and at home. For the limited amount of international travelling that I have done, I have used a laptop for email. In my early days of owning a Zaurus and using the Internet, there was simply no email software available for this PDA. By the time it did come along, I was quite happy using my PC for email.
For this evaluation, I used my ZR-5700 with an Apex Data Model 2496 Fax Modem PCMCIA card. Even though the modem's top speed is 2400 baud, I like it because it has a low enough power drain that I can run without an AC adapter. Also, I only planned on sending and receiving small Internet email messages locally, so speed wasn't an issue. If I did intend to dial long distance and had larger files, then I probably would have used my Megahertz Model 4144 PCMCIA fax/modem. It runs nicely at 14.4 Kbps in my Zaurus.
Installation
The Z-Email software package contains a single 3.5 inch diskette and a 32 page paper User Guide. The user guide is well written, giving the installation steps in detail, for either Windows 95, Windows 3.11 or DOS. Under the system requirements section, they should have given the minimum amount of free Zaurus memory needed to load it. I found it to be around 400K by trial and error.
Once loaded, the software occupied 352K. For a ZR-5700 user, this really means that extra memory is required to have room for both the email program and regular Zaurus data. Using a 1 MB SRAM PCMCIA card and a Sharp 'side-car' modem should be fine. Since I was using a PCMCIA fax/modem card, the SRAM card route was not an option. For most ZR-5800 users, the built-in RAM is probably sufficient, because of the 1.6 Meg of total user accessible RAM.
From the time I first sat down until I had sent and received my first Zaurus email, 2.5 hours passed by, rather quickly I might add. At the start of the installation I archived my current Zaurus data to my Maxtor MobileMax 2 MB Flash RAM PCMCIA card. This turned out be a good thing, as I will explain later.
For Windows 3.11, such as I have on my home office PC, the Z-Em@il user guide recommended running the installation from DOS. I was tempted to use my old 286 desktop PC, though I resisted the temptation. It now just sits in the corner of my cosy office, longing for attention.
The physical link that I used for the install was the Sharp RS232C Level Converter Cable, Model CE-133T. I then ran the 'Install' routine directly from the supplied floppy in drive B:. As expected, the Zaurus first has to be kicked into the PC Link utility, which is under TOOLS in my Zaurus. The installation program allows the Z-Em@il to be downloaded into either the main memory or into a PC card in the Zaurus. For my work, I loaded it into the main memory of my Zaurus. I tried a few 'goofy' things on purpose, such as setting the destination as PC Card, with no PC card installed.
In each case the installation program handled my 'goofy' gracefully without locking up. The installation program did a check of the available memory in the Zaurus before attempting the download and stopped with an error message of insufficient free Zaurus memory. However, it didn't tell me how much short I was! That is when I started erasing things.
Since, I had already archived all of this data to my flash RAM card, I wasn't concerned since I knew I could readily restore it after my testing was completed. After several erasing sessions, I found that the installation program needed about 400 KB free before it would proceed.
The download from the PC diskette to my Zaurus went well across the serial link. It took 10 minutes exactly to transfer 327 KB of data. The program ends up as an attractive Z-Em@il Icon under the MORE area.
Setup
Now that the software had been downloaded into the Zaurus, it had to be configured. My advice is that you gather in advance the limited amount of information you need. The User Guide has a nice form for doing this. It has the added benefit of recording your settings for the future, as part of 'Murphy proofing'. I know from experience that if you record things, then you won't need them.
After starting up Z-Em@il from the MORE area, by touching the Icon and selecting the SETUP menu item from the top menu bar, the Profiles screen shown next appears.
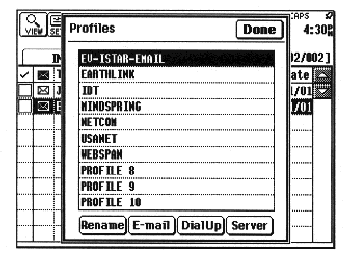
Figure 1: Profiles Menu
There are 10 different profiles that can be set up so that later, several different email accounts / providers can be accessed by a single menu pick. Many people will have a personal email account and a business one. If you are a traveller, then it is a way to have at least 10 cities setup and ready to go. As you can see, several popular Internet providers are already partially set up.
For my tests I set up only one account named EV-ISTAR-EMAIL. I picked my name by touching the Rename button on the bottom of the screen and entering the name. Touching the E-mail button took me to the next screen shown here.
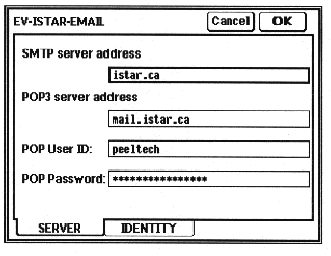
Figure 2: SERVER Tab of E-mail Setup Menu
It has a tab at the bottom for SERVER and a tab for IDENTITY. You can see the data that I entered for the SERVER except the contents of my Password, of course. The next screen shows the IDENTITY data that I entered.
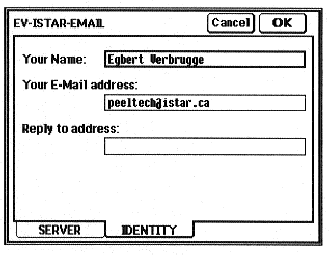
Figure 3: IDENTITY Tab of E-mail Setup Menu
From here, I went back to the Profiles menu and picked the DialUp button. This resulted in the next screen which has a MODEM tab and a DIAL-UP tab.
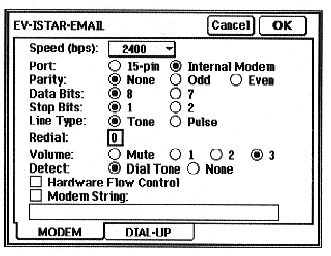
Figure 4: MODEM Parameters Menu Tab
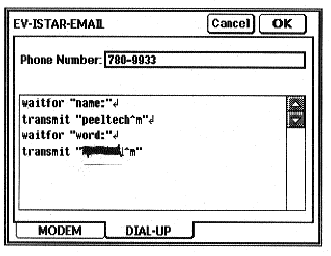
Figure 5: DIAL-UP Tab
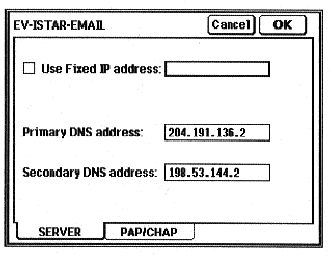
Figure 6: SERVER Tab from Profiles Menu
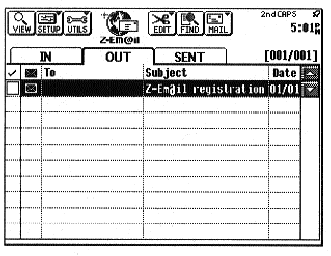
Figure 7: Z-Em@il Main Menu
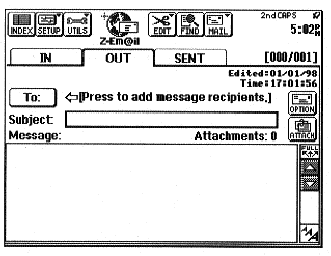
Figure 8: Preparing an Outbound Email
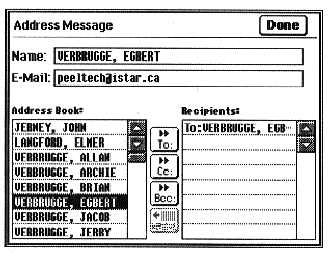
Figure 9: Address Book
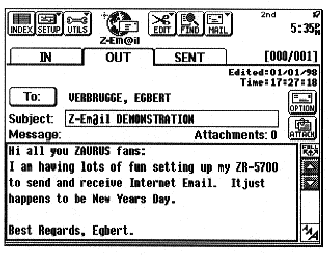
Figure 10: Entering Text for the Email Message
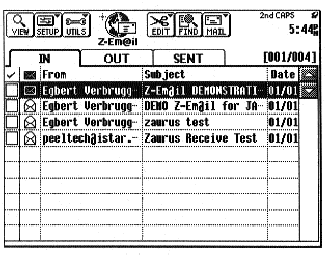
Figure 11: IN Box of Main Menu
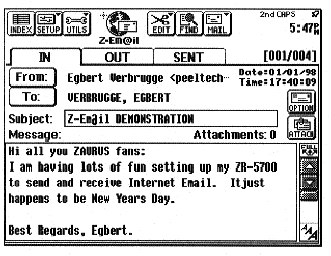
Figure 12: Reading an Email Received
Please feel free to email me at support@peeltech.ca with your comments, Zaurus questions or your PDA story.
