The Christmas festive season is now just a pleasant memory and it is time for most of us to get back into a serious work mode. In my December article I described some general things about Zaurus including the users operating environment. I described details of using the pen and the keyboard for input and how the Zaurus applications run. I then began describing the built-in applications, starting with the Preferences options under the 'TOOLS' icon. Then I went through how I use the 'CONTACTS' application for managing my telephone lists and address lists etc.
DOCUMENTS Application
The next Zaurus application that I will describe here is the 'Documents' application. It is a very capable word processor, complete with a spell checker. I enter and store documents in there that probably you wouldn't think to do. For this article I ran through this list and will give you the range of topics for my online documents: meeting agendas, Zaurus's battery history, reference book list, work activity list, buzzwords / acronyms from the computer world, staff vacation schedule history & future bookings, computer show Zaurus demo document, International telephone country codes, meeting notes, draft agent agreement, special project DO list, business letters, my monthly diaries, letters to my father, letters to my brothers & sisters, my (very confidential) ideas log, a poem I wrote in memory of my mother, modem setup strings, office location map (text and graphics mixed), car maintenance log, company brochure, business plan, product price list, list of active projects, book review on software engineering, list of my favourite songs, voice mail access instructions, and 1-800 numbers. The above documents were started or completed in a whole range of places from my car to restaurants to sitting by a hotel pool. The portability and convenience is something that is understood and appreciated best by those who use KPDA's. The hotel pool episode was interesting. Out of the corner of my left eye, I saw some attractive ladies, one by one make their way to the side of the deck where I was typing on my Zaurus. They didn't say anything, but I think their curiosity got the better of them, i.e. to see what I was doing. At first I thought it was my good looks, but then I figured out what was really going on.....sigh...
Nitty Gritty of DOCUMENTS
Lets look at some of the intricacies of the 'Documents' application. One touch on the right side 'Documents' icon puts me into the opening file menu seen here in Figure #1.
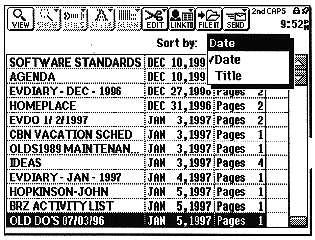
Figure 1: DOCUMENTS Application Opening Menu
I can access the contents of an existing file by one pen touch to highlight the file, followed by one more touch to open it. To move up or down a screen of files, I can touch the pen above or below the marker in the slider bar, at the right of the screen. I can also use the pen to drag the marker in the slider bar up or down. Last but not least, I can scroll through the file list by pen touching the up & down arrows at the top of the slider bar. But wait, there are more ways yet to navigate through the list of files.. From the keyboard I can use the cursor up & down keys to scroll through the list. Pressing the 'enter' key will open the highlighted file. To move up and down a screen full of files at a time I can press the 'prev' or the 'next' key. After reading the above, I expect that you will realize that the graphical user interface, is indeed very much like what you are familiar with in the PC world.
I will now list the drop-down menu options under each of the icons on the top of the menu showing on Figure 2. I won't undertake to explain them since I think most are self-explanatory.
Under 'SHOW' is Show Ruler, Hide Ruler, Show Special Symbols, Hide Special Symbols, Print Preview, Header, Footer.
Under 'UTILS' is Find Text, Insert Page Break, Make a Letter, Check Spelling, Page Setup.
Under 'STYLE' is Plain, Bold, Italic, Underline.
Under 'ALIGN' is Left, Center, Right.
Under 'EDIT' is New Document, New Copy, Document Title, Revert to Saved, Delete Document, Delete Group, Cut, Copy, Paste, Secret Entry, Normal Entry.
Under 'LINKTO' is Contacts, Data Files.
Under 'FILEIT' is the file box metaphor / the 'FILER' application which I will talk about in a future article.
Under 'SEND' is Unit to Unit, Print, Fax, Copy to PC Files, Get from PC files, Replace with PC files.
Now for some observations based on my own use. The font choice with the Zaurus is very limited. If I need to print in another font, then a transfer to the PC via RTF using ZRLINK, followed by a font change on the PC gets the job done. My guess about this shortcoming is it was deliberate because of the RAM space needed to store each font. Another slightly annoying limitation is as follows. When well along into a long document on the Zaurus, the Z's response slows down significantly when I am in input mode. To get around this, I usually keep documents under 2 typewritten pages or less. If I go over that length, Zaurus still accepts my keystrokes but it can't keep up to me if I am really pumping in text. If I persist in creating a larger file still, I get to the point where no more characters will go in a given file. While this is a limitation, it doesn't hinder me much. A little creativity using the long file names makes short work of this extra file management. It is just a matter of habit. When my Z slows down, then I start another new document, with a given prefix for the filename and a page related suffix. I can have as many documents as there is storage memory for, each stored away with its own file name. For creating documents, the highlight, drag and drop feature really makes it convenient to record text and then organize it later.
When I am ready to print, I use the Laserjet III emulation most often. The series of printers that are supported by ZR5700 and ZR5800 are as follows: Canon BJ-10e, IBM Proprinter, Epson FX-80, FX-850, LQ, HP Laserjet II, Laserjet III. These drivers are all built-in readily accessible from the print menu. The file can either be open or closed to print it.
The following screen is a copy of the display after opening the OLDS1989 MAINTENANCE file.
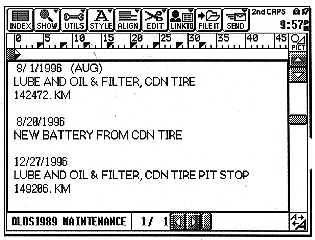
Figure 2: OLDS1989 MAINTENANCE File Contents
The file name of the document is shown in the lower left portion of the display. The page number is shown there also. You can also see the horizontal slider bar along the right side of the screen at bottom.
I have a habit of entering data in upper case for short notes, file names etc. This is certainly not required. This is just me. When I am writing a report, then I go back to the conventional way of using upper case letters.
The following screen is with a different file open. Do you know what the file name is? You should, if you read and understood my previous explanation.
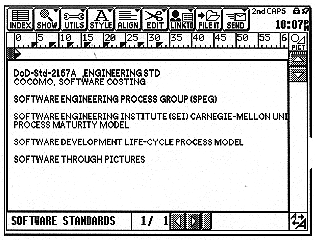
Figure 3: Contents of Guess What File?
You will see that the font of this data appears to be smaller. What I did was to touch the 'A ' look-alike symbol in the lower right-most part of the screen to change the visible font size. There are 3 sizes that you can choose. You should think of this as a zoom function, rather than a change to actual font size in the document. You can note at the top of the screen that 62 columns are being viewed, versus the 46 that are in screen 2. I change this size fairly often to optimize viewing, depending on what application I am using, as well as what type of file I have open. If the lines are short bullet type ones, then I will change to the bigger viewing font. If they are longer, such as in a report, then I will use the smallest viewing font, as long as the viewing conditions are ok. There is lots more that I can tell you about documents, but I expect that you have heard enough to see and sense the power that is always at my fingertips.
SCRAP BOOK ApplicationThe 'Scrap Book' application is a fun application where I create things and scrap things at will. The learning required to make it go was minimal. Scrap Book has the concept that there is one book where you can add, access, edit or remove pages of image type data. At the present time I have 27 pages of images that I am not yet ready to throw away. Scrap book handles two basic types of files. One is sketches (or any doodling / writing that I care to do) with the touch pen. The other is drawings created on a PC which have been downloaded into the Zaurus. Scrap Book is a paint type of program rather than a draw / illustrator program. I use Scrap Book to capture quick written or printed notes and idea / brainwave type sketches. Frequently, I transfer the ideas / text / information into the appropriate Zaurus applications later during a more private and convenient time.
Figure # 4 shows what appears after I have pen touched the side bar icon and scrolled to a sketch that I entered previously. As an aside, Figure #4 was a real spontaneous sketch that I made one day when I had a revelation of how our human brain functions might be organized. I thought it was worthwhile to capture, so I did! Remember, Zaurus allows me to work anywhere, anytime. Just so that you will not worry about me, I want you to know that I haven't published this brain model in any medical journal, yet.
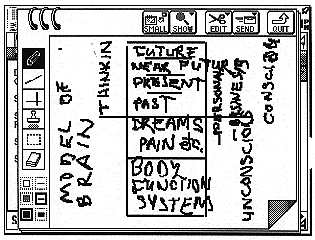
Figure 4: SCRAP BOOK Application: Previously Entered Sketch
First, I will describe the icons showing at the top of the screen. The first menu icon starting from the left is 'SMALL'. One touch of this will save any work that I have created and then shrink the Scrap Book window to the lower right quadrant of the screen. It will stay visible when I go to another application such as documents or contacts. I use this feature for making quick notes in scrapbook and then later keying the data into an application, ready from the 1/4 size window, if I want to keep it. Then I expand the 1/4 scale window to full size and delete that page of the scrap book by hitting the 'delete' key.
The next icon in the top tool bar is 'SHOW'. By touching it, a drop down list of 'First Entry' & 'Last Entry' appears. I don't use this much. I just use the 'PREV' & 'NEXT' keys to scroll through the pages of the scrap book. The next icon on the top tool bar is 'EDIT'. It contains New Entry, Revert to Saved, Delete Entry, Delete Group, Cut, Copy & Paste. These operate as you would expect.
The next icon at the top is 'SEND'. It contains Unit to Unit, Print, Fax. This gives me the capability to output/transfer my work as required.
The last icon at the top is 'QUIT' that sends me out of Scrap Book, after I have captured a spontaneous flash of brilliance or perhaps something more mundane.
The drawing tools that Scrap Book has are basic as can be seen from the tool bar at the left side of Figure #4. With the top pencil icon, the touch pen acts like a pencil. I touch the pen to the screen and as I move the pen along, Zaurus traces my path and leaves a line until I lift the pen. The second tool allows me to draw straight lines by touching the pen where I want the line to start and dragging and lifting the pen where I want the line to end. The next tool only allows me to draw horizontal or vertical lines. The next tool down, the 'stamp' pops up a tool bar at the top of the screen with a range of predefined symbols, including buildings, street intersections, railway tracks etc. I haven't found any real use for this in my work of electrical engineering and computing. The next tool is a box to restrict the edit area for basic operations of copy/cut to the clip board, erase and paste from the clip board. The next tool below that is an eraser. If the eraser is highlighted, the pen then erases as it is touched and moved across the screen. The last 3 left-most vertical set of tools sets 3 line weights: from 0, grey and solid black. The last 3 right- most vertical set of tools sets the line widths from fine to medium to thick.
Figure #5 below shows another use of the scrap book.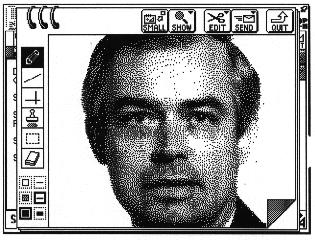
Figure 5: Scanned Image Downloaded Into the SCRAP BOOK
This is a photo of me that I faxed into my desktop PC and eventually transferred to my Zaurus. The format and size of the graphic file must be just right for the Zaurus to accept it properly. The easiest way I discovered to get it right was to transfer a blank Zaurus sketch up to the PC using Sharp's ZRLINK program. ZRLINK converts from Zaurus internal format to BMP format as it does it's work. The physical connection that I use to my PC is Sharp's serial cable Model CE-133T. Then I use the BMP file as a template for Window's PCPAINT program. Then on the PC I can create what I want and download it into the Zaurus for the scrapbook or inserting into Zaurus documents, from there. This sounds more complicated than it really is. The graphical user interface on my PC and on my Zaurus make it quite easy.
Again, this seems like a convenient place to break for now. Stay tuned next month for the next instalment on what else I do with my Zaurus and how I do it.
Please feel free to email us at support@peeltech.ca with your comments, Zaurus questions or your PDA story.
