To have an electronic spreadsheet in my pocket to record expenses while travelling, to make series of complex scientific & financial calculations, to display the results and to chart data, anywhere, anytime, was nothing but a dream up until a few months ago. Zaurus has realized this impossible dream for me.
For those of you who have never worked with a spreadsheet program, it is amazingly simple yet powerful software that can be applied to solving hundreds of different problems in almost every discipline imagineable. EVERYONE should look at spreadsheets enough to understand what they can do and how they work, especially now that electronic spreadsheets lurk in many pen based PDA's. The price performance of PDA spreadsheets is outstanding, when you consider that a single user spreadsheet license (no hardware) for a desktop PC costs as much as a whole Zaurus. As a bonus Zaurus, comes complete with ALL of its other personal information management software, some of which I have written about already in earlier articles..
THE EARLY DAYS OF SPREADSHEETS
A few of us can well remember when electronic spreadsheets were invented. They started appearing on early personal computers that were a novelty for most people. My work at that time was on Control Data 6600 & Cyber 70 mainframes processing jobs mostly in batch mode. As well as other scientific and engineering software, our company had developed a popular financial planning package, called FIPAC. It had several of the concepts common to today's spreadsheets. When I got hold of a VisiCalc brochure, the spreadsheet application that was causing a small stir in parts of the computer community, I could hardly believe my eyes! Thoughts racing through my head included "a) What a brilliant idea, all running on cheap hardware with no expensive usage fees and b) Why hadn't I thought about doing that?" A number of tiny software companies like Lotus and Microsoft jumped on the idea, and as the saying goes, the rest is history.
When I first started looking at PDA's and palmtops two years ago, I was amazed and excited when I discovered that the HP200LX had a version of Lotus123 built in. However, I was disappointed that only the cursor control keys navigated the worksheet. Even though the temptation for a set of electronic worksheets in my pocket was strong, I couldn't imagine using only cursor control keys to operate a spreadsheet for any length of time. I then settled for a Zaurus ZR-5000 with its pen & large, legible touch screen that had all the personal information management software that I wanted, except a spreadsheet. Once the ZR-5700 became available with a spreadsheet built in, I couldn't wait any longer and upgraded to it.
Financial applications come to mind most often when thinking about spreadsheets, but creative people have used spreadsheets to handle things as complicated as engineering design and as varied as database, statistics, cost estimating, product catalogues, parts lists, price lists, order forms, invoices. Many moons ago, I made up a worksheet on my PC that was a basic bookkeeping system for small businesses, complete with journal entries, named accounts, automatic posting and instantaneously updated Profit & Loss Statement and Balance Sheet.
Some PDA prospects have said to me "I have NO need of a spreadsheet". I really have to bite my tongue sometimes (and count to ten silently & slowly) when that happens. Other people have lamented to me that their Zaurus is not readily programmable. As long as their Zaurus is newer than a ZR-5000, I tell them: "IT IS, if you use the built-in spreadsheet". For number crunching, decision support and data management applications, anyone can set up worksheet templates to input data, perform the calculations and present the results, all with excellent operating speed.
I will now discuss specifically the technical details of the Zaurus spreadsheet application.
GENERAL ENVIRONMENT
On my ZR-5700 I enter the spreadsheet application by tapping the spreadsheet icon on the lower right of my screen. The spreadsheet is PenCell 2.0 made by PenWare Inc. of Palo Alto, California. There is no limit on the number of worksheets that can be saved and recalled, other than available memory. The 20 character long file names help with the file management. File names can be displayed in order by title or by date. The spreadsheet application is always open, and remains in the same state when another application is selected or the Zaurus is turned off. This makes it convenient to interrupt what I am doing, such as to record an appointment, go for a coffee break and then continue on where I was in the worksheet.
The pen & touch screen are well integrated with the application software to give a great user interface for both setting up worksheets and entering data. For experienced users there is a set of 36 Key strokes & key combinations for using the spreadsheet even more efficiently.
Z spreadsheets can be easily exchanged with your PC, and vice versa to get even more use out of them. Z can read Excel 3.0 and 4.0 worksheet files. It writes Excel 4.0 worksheet files.
The following table is a menu map of the Zaurus spreadsheet application. The three operating modes are INDEX, WORKSHEET and CHARTS. For each mode the menus and sub-menus are shown in the table. Where there are "..." after the submenu, it means there are additional prompts on the screen that I have not shown in my table.
Detailed Menu Table
I encourage you to go and study this map, because it will give you a good idea of the computing power and options that the spreadsheet has.
INDEX MODE
The following screen shows some of the built-in templates, one of two that comes up when I am in Index mode. A double tap on the highlighted choice will make a copy of that template and sends me into worksheet mode.
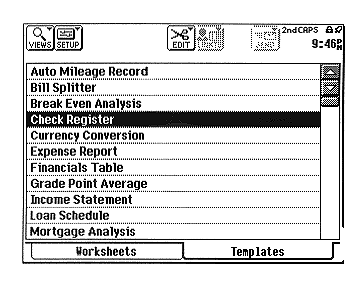
Figure 1: Templates Menu
Zaurus comes with a set of 13 templates already set up so that you can start using the spreadsheet program immediately. If you are just starting with Zaurus spreadsheets, they can be used to help learn how to do things by seeing what is there. Some of you experienced users may be wondering if you can add templates to this area. The answer is no. What you see is what you get. However, you can still make up template / blank worksheets and store them in the worksheet area for future regular use.
The other choice when in Index mode is shown in the following screen. This is where all of my worksheets are stored. I can also arrive here by tapping the Worksheets tab at the bottom of the screen. I have highlighted the FAMILY BUDGET selection in preparation to call it up.
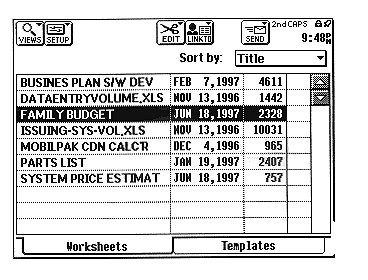
Figure 2: Worksheets Menu
You will notice on this screen that I can choose the sort order for the index. I have it set for Title. The third column to the right shows the size of the spreadsheet in characters.
WORKSHEET MODE
After double tapping the screen or hitting the enter key in index mode, the highlighted worksheet (FAMILY BUDGET) is opened and Zaurus goes into worksheet mode. This worksheet can be seen in the next screen. It is one that I created myself starting from a blank worksheet.
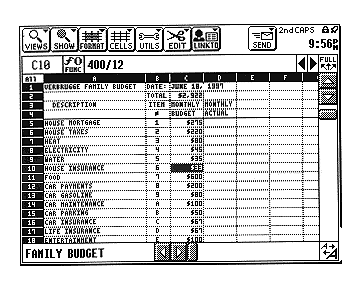
Figure 3: Family Budget Worksheet
I have reduced the screen display font to the smallest one, by tapping on the lower right "A" box, so that I can see more of the worksheet. Columns are labelled A, B, C, D... etc. through to BL. Rows are labelled from 1 to 128. This gives a total of 8192 cells to enter data, formulae etc. The lower left box of the screen shows the name of the worksheet that is being worked on. The cursor is on cell C10. The line under the top tool bar shows the formula 400/12 there. I have taken the annual insurance of $400. and divided it by 12, since this is a monthly budget. You can observe that I have changed the width of columns A, B from the default. This is one of the options of the CELL menu. It is easy to do by dragging the edge of the field. Also you will notice that I have set the alignment of each of A, B and C to left, center, right respectively. There is also a General setting that is available.
The next screen is the same spread sheet but in an altered state of viewing. You may notice that the tool bar is now longer showing and I have a larger viewing area. I turned it off by tapping the "FULL" button that can be seen on near the top right of the previous screen. This can also be done from a sub menu item in the SHOW menu. Now the top right shows a "SMALL" button, that will pop the tool bar back up whenever I want.
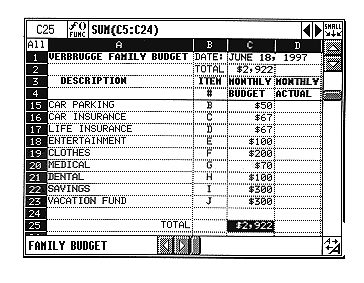
Figure 4: Full Screen View of Family Budget Worksheet
The cursor is on cell C25 which has the SUM(C5:C24) formula as can be seen in the middle box in the top line of the screen. I have changed the zoom / display font size to the medium size also, partly to be more legible in this article and partly because I don't have my reading glasses on. I have locked the top 4 rows to behave as the headings. I have scrolled the worksheet to show rows 15 - 25 below that. There are little things that you can do when laying out your worksheets to make them more useful, such as putting a Total in the locked rows, such as I have done (C2). Then it is always visible and updated as I scroll and change the values in the worksheet. So even with a relatively small screen, I can achieve what I want efficiently, without a lot of scrolling back and forth.
You can also see that I have formatted the numbers in column C as dollars. The next screen shows the screen that comes from the FORMAT menu, FORMAT submenu.
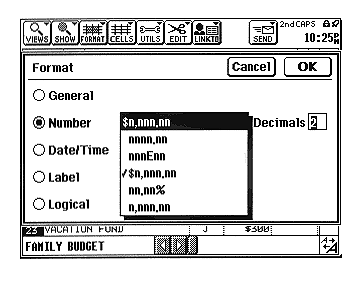
Figure 7: Cell Format Menu
By highlighting a set of cells in advance of calling this menu, and picking the $n,nnn.nn format desired, I set the format to dollars. Other classes of formats are General, Date/Time, Label, Logical, each with their own options.
CHARTS MODE
Much of the power of spreadsheets come from their ability to easily graph numerical data. The next screen shows a pie chart of my budget data. With the worksheet open and cells C5 through C23 highlighted, under the VIEWS menu item I chose CHARTS. This puts me to a submenu that asks which of the earlier created (by me) and stored charts that I want.
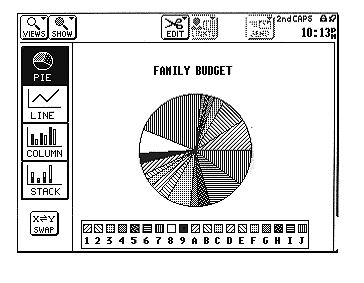
Figure 5: Pie Chart of Data
You will see a legend across the bottom of the screen that corresponds to my Item #'s in cells B5 through B23. By convention, the spreadsheet knows that the cells which are to the left of the data, are the labels for the legend.
The next screen shows a Column Chart which is easily set up by tapping the COLUMN icon on the left side of the screen.

Figure 6: Bar Chart of Data
If there was ACTUAL data values, then it would show up in bars beside the BUDGET bars. I left this data out on purpose, so you wouldn't know whether I am good or bad at sticking to my budget! I won't go into the details of how to create and store a chart, but it is easy. The chart instructions are stored away with the worksheet to which it belongs and so it is convenient and foolproof to manage them.
BUILT-IN FUNCTIONS
There are a number of built-in functions that can be called up and used. A tap on the UTILS menu, gives a drop down list which includes "Insert Function". A quicker way to get there is to tap the "f-FUNC" box in the line under the top menu bar, at the left side. The following screen shows the Zaurus in a state ready for picking a function.
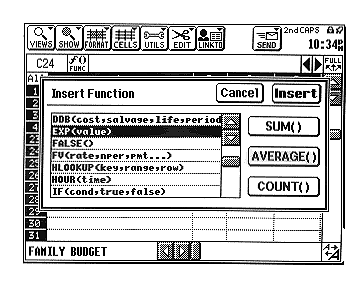
Figure 8: Built-In Functions Menu
If you already know the function name you can type it in directly, without doing the above step and it will be recognized automatically as a function. To enter the range of cells for the arguments of the function, you can drag the pen over the range or type it in from the keyboard.
The built-in functions are listed below by category:
Arithmetic functions: ABS, EXP, INT, LN, LOG, LOG10, MOD, PI, RAND, ROUND, SQRT, SUM.
Date / Time functions: NOW, TODAY, DATE, TIME, DATEVALUE, TIMEVALUE, DAY, MONTH, YEAR, HOUR, MINUTE, SECOND.
Financial functions: DDB, FV, IRR, NPER, NPV, PMT, PV, RATE, SLN, SYD.
Logical functions: AND, FALSE, IF, NOTE, OR, TRUE.
Miscellaneous functions: CHOOSE, COLUMNS, HLOOKUP, INDEX, ISBLANK, ISERR, ISERROR, ISNAA, ISNUMBER, NA, ROWS, VLOOKUP.
Relational functions: <, <=, <>, =, >, >=.
Statistical functions: AVERAGE, COUNT, COUNTA, MAX, MIN, STDEVP, VARP.
Trigonometric functions: ACOS, ASIN, ATAN, ATAN2, COS, SIN, TAN.
TRANSFERRING WORKSHEETS
Some of you may already have worksheets on your PC that you would like to use on your PDA. I transferred a few spreadsheets from my PC to my ZR-5700. After a few minutes of minor repairs of them on my Zaurus, they were fully operational. The ISSUING-SYS-VOL.XLS worksheet that shows on the "Worksheets Screen" is one of them. It uses 114 rows and 8 columns of data, formulae etc. It occupies 10Kbytes of storage on the Zaurus (and a lot more on the PC).
The transfer is a two step one. The first step is to use an optional Link Software to transfer from/to a PC. I use the ZRLink software from Sharp. The file is transferred into the PC files area (MORE area). The next step is to go to the SEND menu and select "Get from PC files" and enter the filenames as prompted.
The next and final screen shows the case where I am replacing a Zaurus worksheet called "PLAYING" with a downloaded Excel worksheet called "YEMVOL.XLS".

Figure 9: Transfer of Excel Sheets In & Out
You can also transfer worksheets to another Zaurus using the built-in infrared ports or direct cable connection.
LIMITATIONS
While there is tremendous power in the spreadsheet, there are limitations that one should be mindful of when planning your usage. Some Excel features and functions are not supported on Zaurus and evaluate to error value and are displayed in the edit bar with the prefix XL_. A minor annoyance is there is no print menu item. However you can use the two key sequence, 2nd P to do a screen print. Another way to generate hard copy is to cut & paste into a document or the scrap book and then print from there. An advantage of this approach is that you can modify the image using the editing tools. A major limitation for power users is there is no macro language as some PC spreadsheets have.
The minimum and maximum limits of the Zaurus spreadsheet are listed below:
Description Minimum Maximum
Number of Columns - 64
Number of Rows - 128
Charts Saved in A Worksheet - -
Rows in a Chart 1 40
Columns in a Chart 1 40
Nesting Level of Parentheses 0 12
Number of Arguments in a Fcn - 30
Number of Terms in a Formula - 60
Numeric value 2.255e-308 1.798e308
Number of Iterations 1 99
Iteration Epsilon 1e-6 99
Number of Characters in a Cell - 255
Number of Decimal Places 0 15
File Size Depends on Available Memory
I would like to hear any of your ideas that this article sparked for the Zaurus spreadsheet application. For those of you already using the Zaurus spreadsheet application in your work or play, I am interested to know how you use it. Please feel free to email me at support@peeltech.ca with your comments, Zaurus questions or your PDA story.